

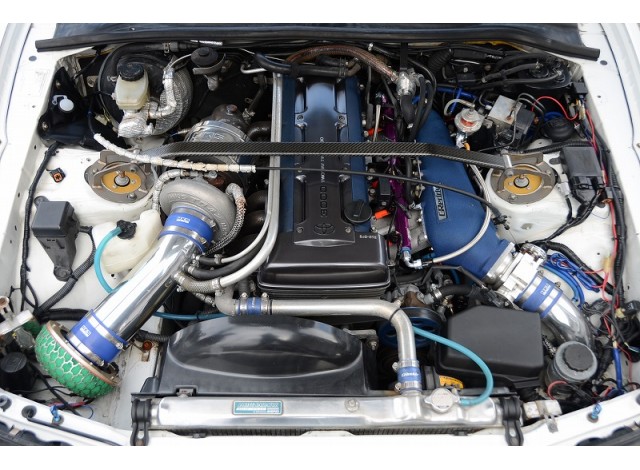
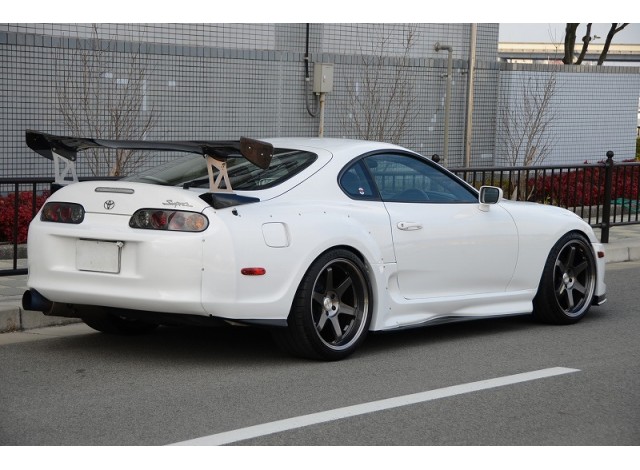
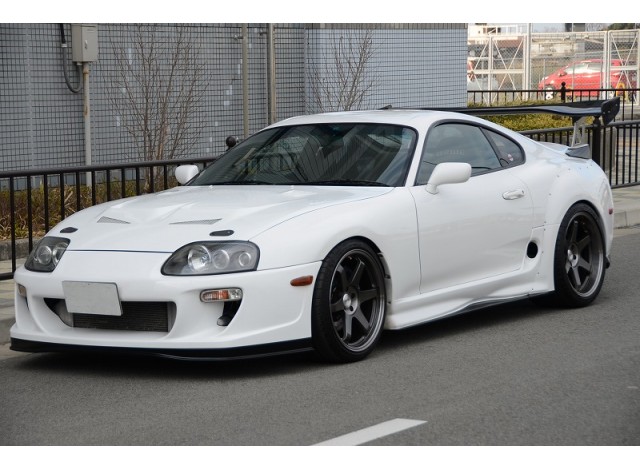
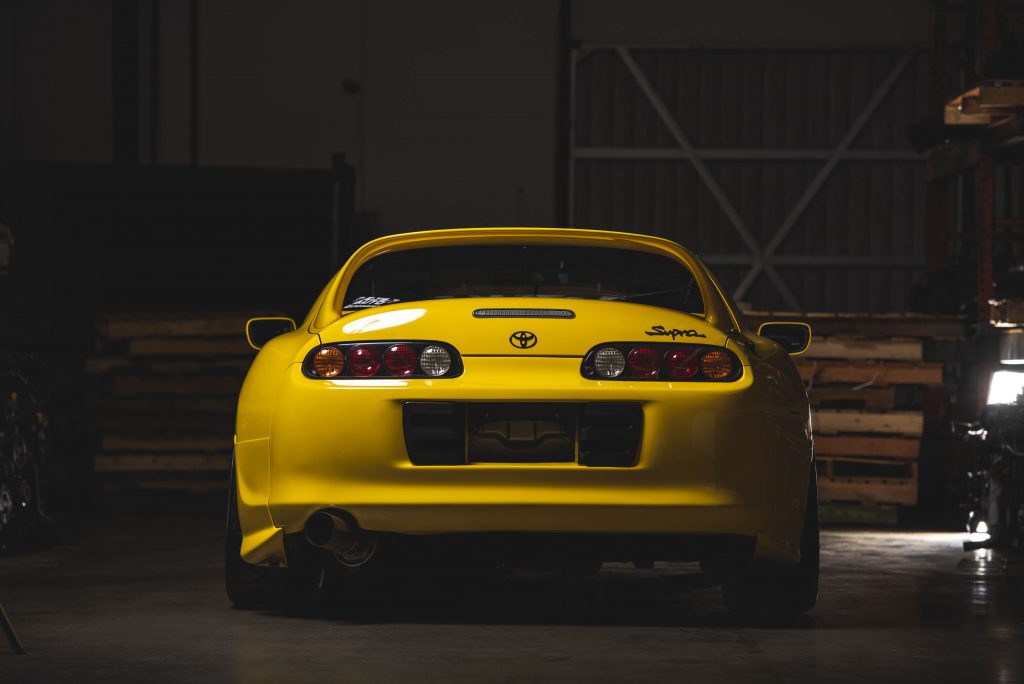
Back in the 1990s, we were spoilt for choice when it came to fast Japanese sports cars. Toyota’s Supra had been around since 1978 but it was the fourth generation, codenamed A80, that really kicked off the badge’s fame. In standard form, the coupe could hold its own against the Ferraris and Porsches of the day but the Supra really found a home amongst tuners, who pushed the 2JZ-GTE engine up into the 1000 horsepower zone, often using stock internals.

It certainly didn’t hurt this engine’s reputation to be paired with the MKIV Supra; a whole generation of enthusiasts grew up with Toyota’s ultimate sports car as an ‘aspirational vehicle’ the same way 80s kids had posters of the Lamborghini Countach on their bedroom walls. A certain movie franchise that will remain unnamed here helped fuel that fire, and even if you didn’t know a wastegate from a blowoff valve, if the 90s were your formative gearhead years you could recite the factory 2JZ-GTE specs by heart like your older brother could rattle off the Konami code.

While even casual US fans of import performance hold the 2JZ in high esteem, unless you’ve torn one apart and put it back together again, all the details both large and small that earned its bulletproof reputation may not be a part of your knowledge base. To rectify that, we’re going to look at why this twin-turbo inline six became a world-beating engine, starting from the very basics.

GETTING THAT 6-PACK
To begin with, there’s the cylinder layout. Today’s 6-cylinder engines are almost exclusively V-block designs - this layout makes for a very compact engine that is well suited for short engine bays in cars with longitudinal drivetrain designs (where the engine’s crankshaft runs front-to-back) as well as in front wheel drive transverse setups (with the crankshaft running side-to-side). Unfortunately, V6 engines offer significant challenges in terms of firing order, requiring either ‘split’ rod bearings on each of the three pairs of crank throws to even out the timing of each power stroke, or an “odd-fire” crank design with the cylinder pairs sharing a single throw, but the firing events at uneven intervals of crank rotation.
MATERIALS MATTER
Another critical factor in the 2JZ’s high threshold for abuse is the cast-iron block. While it’s certainly possible to build a durable all-aluminum engine for forced induction, iron is more forgiving of stress, with less thermal expansion and a defined fatigue limit. The latter sounds like a bad thing, but it’s the reason springs are made from steel and not aluminum - when stressed below its fatigue limit, an iron block can handle an effectively unlimited number of load cycles without metal fatigue, while aluminum gets a tiny bit closer to failure every time stress is applied. There is a price to be paid for the 2JZ’s iron block construction, though; it’s one of the major reasons why a fully-dressed engine tips the scales at over 500 pounds.
Speaking of that block, it’s a seven-main-bearing design with a deep skirt at the bottom that extends past the crank centerline. Many engine blocks are designed in such a way that the main part of the structure ends right at the crank midline and the main bearing caps project beneath it. While less expensive to cast and machine, this type of block usually needs reinforcement of the main bearing journals for high performance use. In classic domestic V8 engines, you’ll hear about “four-bolt mains” where each cap has an additional pair of bolts, often splayed at an angle to the primary pair, to cure this weakness.
THE LEGENDARY 2JZ-GTE: STILL AWESOME AFTER 20 YEARS
There’s no magic behind the success of Toyota’s most popular powerplant - just sound engineering and a focus on getting the basics right.
Toyota’s 2JZ-GTE is legendary among car enthusiasts for its durability and power potential, capable of reliably delivering 700-plus horsepower without ever touching the factory long block, and four-digit dyno numbers with the right internals. A product of 1990s Japan’s economic boom, saving money on its design and construction was nowhere near the top of the priority list, and the result was an engine fit to be Toyota’s flagship in the secret JDM horsepower war of the era.
 While even casual US fans of import performance hold the
2JZ in high esteem, unless you’ve torn one apart and put it back
together again, all the details both large and small that earned its
bulletproof reputation may not be a part of your knowledge base. To
rectify that, we’re going to look at why this twin-turbo inline six
became a world-beating engine, starting from the very basics.
While even casual US fans of import performance hold the
2JZ in high esteem, unless you’ve torn one apart and put it back
together again, all the details both large and small that earned its
bulletproof reputation may not be a part of your knowledge base. To
rectify that, we’re going to look at why this twin-turbo inline six
became a world-beating engine, starting from the very basics.
Another option is a flat-6 design, favored by Porsche and Subaru. This also gives a very short engine from the crank snout to the flywheel, but a very wide one. Firing intervals aren’t an issue in what effectively is a V6 engine with a 180 degree cylinder bank angle, but this layout has inherent imbalances in the reciprocating and rotating planes because of the offset of the cylinders.

The 2JZ, however, is a classic inline-six. This engine geometry offers ‘perfect’ primary balance and silky-smooth operation at any speed–an important consideration for a powerplant intended for use in Toyota’s premiere performance cars. The firing order, with evenly-spaced firing intervals and overlapping power strokes, also lends itself to turbocharging as it smooths out pressure delivery to the turbine(s).

While the 2JZ has two-bolt main caps, they are inset into the block’s thick main web, which gives them extra support without needing an additional pair of bolts. Nissan addressed this issue in the 2JZ’s arch-rival, the RB26DETT, with a ‘girdle’ that incorporates all the main caps into a single structure, and modern V8 engine designs like the GM LS and Ford Modular families use deep-skirt blocks with cross-bolt main caps. Compared to these other fixes, Toyota’s approach is elegant and simple, and hasn’t proven to be an issue even when the 2JZ is pushed far beyond its original horsepower and torque output.

A cast cover with a separate small, stamped metal sump for oil control rounds out the bottom end of the 2JZ, with the cover acting as a stressed component of the block rather than simply keeping all the oil from falling out the bottom of the engine. Having a fully “boxed” crankcase is another intentional choice by Toyota to make the block assembly as strong and rigid as possible, without introducing additional complexity or expense.
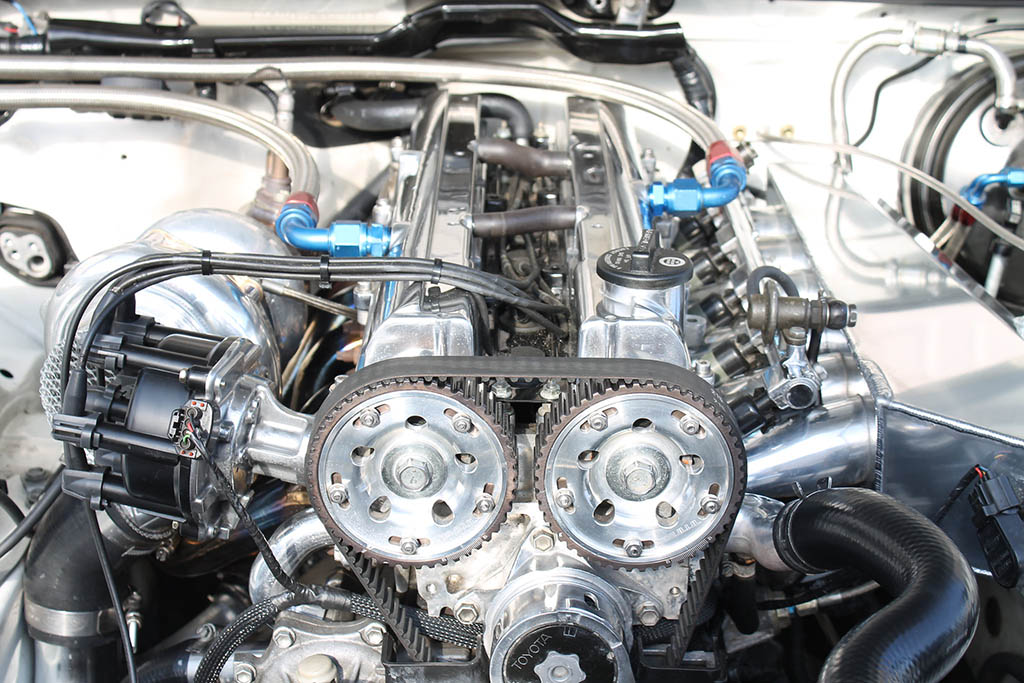
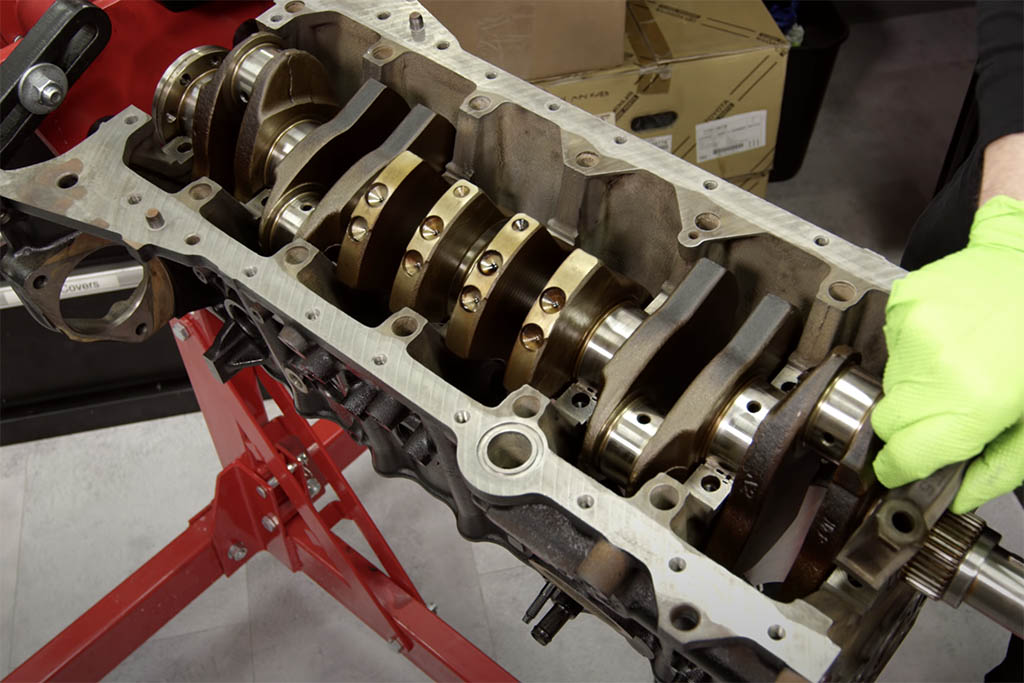
The stock 2JZ crankshaft is another strong point of these engines. Because inline-six cranks are, by necessity, relatively long compared to most other engine layouts, there’s the potential for them to act like torsion bar springs, twisting along their axis and even having issues with destructive feedback if the frequency of the power pulses lines up with the harmonics of the crank. Knowing that this was a potential weak spot, Toyota’s engineers specified a forged, rather than cast crank, with relatively large 62mm main and 52mm connecting rod journals. While aftermarket billet cranks are available, for all but the most extreme builds they’re simply unnecessary–that’s how good the factory crank is.
Heading up the block, you’ll find special GTE-spec rods that are stronger than the ones found in naturally-aspirated 2JZ-GE engines, plus turbo-specific cast pistons with a slight dish to lower compression ratio to a boost-friendly 8.5:1. The underside of the pistons are cooled by oil squirters fed by a gallery at the bottom of the cylinder bores to help prevent detonation caused by hot spots as well.
GETTING A HEAD
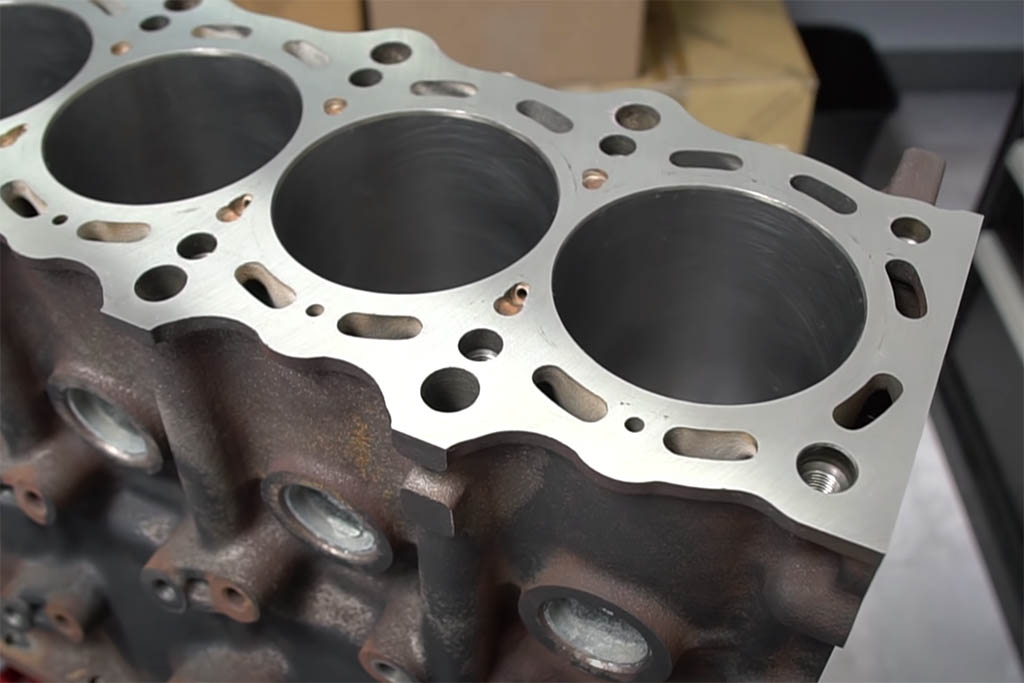

Where the block meets the head, the 2JZ uses a ‘closed deck’ design that fully supports the cylinder bores. Compared to an ‘open deck’ block, this leaves less room for coolant passages, but it is a far better way to prevent head-gasket-killing bore shift under boost and maintain the head-to-block seal. Speaking of head gaskets, the stock 2JZ comes with a multi-layer steel gasket of the type typically used as an aftermarket upgrade as another way to prevent combustion leaks. The head is secured with 14 bolts, arranged so that each bore is surrounded by fasteners on all four corners. Replacing these factory parts with upgraded bolts or studs is a relatively inexpensive way to make an already-stout engine just a bit more durable - since the factory fasteners are single-use ‘torque to yield’ bolts they will need to be replaced anyway once the head comes off for any reason, so you might as well upgrade while you have the engine apart.
SUPRA "A80" VVTI OCV OIL FILTER REMOVAL:
I treat my cars seriously, service intervals on my cars are a must!
This guide shows how to replace the VVTI OCV filter on the 2JZGE VVTi engine.
Many of you may think this is unnecessary thing to do, but you're wrong!
This filter needs to be at least cleaned if/or not replaced.
There is a chance that OCV filter does not come out and is left in the
hole. You can use needle nose plyers, a small flat head screw driver or
other method to remove it, like I did (check photos bellow).
 |
| This is how the motherfucker looks like! |
Tools Required;
- 22mm spanner or socket
- 10mm spanner or socket
- 5mm allen key or socket
- Needle nose plyers or small flat head screw driver or self drilling screw.
- Rag
Optional Parts Required;
*Note – These are only required items, if you believe these are in bad condition, faulty or are damaged as part of removal/installation go replace them with the new ones.
Starting Process:
1. Unscrew banjo bolt with 22mm spanner, u can use rag to prevent any oil from dripping out.
2. Now this part can be tricky if your filter fall off the banjo bolt and is left in the hole u're fucked up.
3. No u're not. Don't worry! Go find yourself a selfdrilling screw with the exact size of (
4. Screw it in the filter and once u get the feeling of it being attached, just gently put the out of the hole.
Valve clearance - 2JZ-GTE Engine - Toyota Supra A80
- Remove ignition coils assemblies (See page IG-6 )
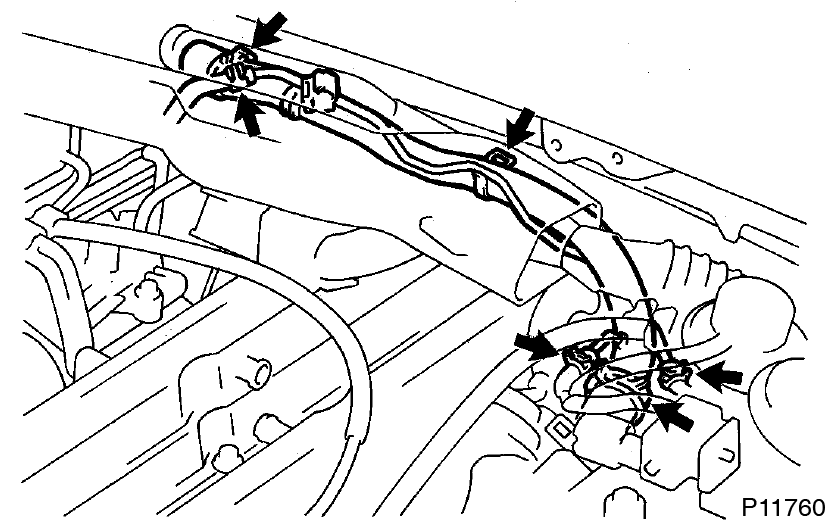
- Disconnect engine wire protector from No.4 timing belt cover
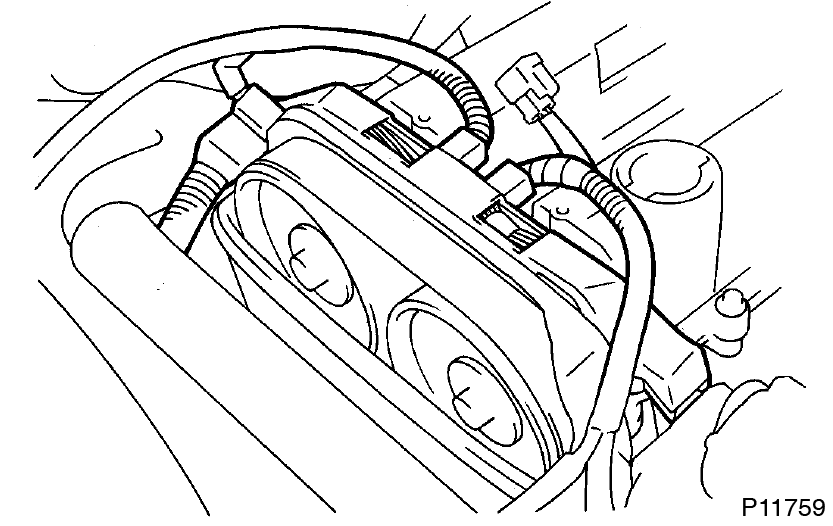
- Disconnect the engine wire from the 4 wire clamps.
- Lift out the engine wire protector from the cylinder head covers.
- Disconnect engine wire protector from cowl top panel
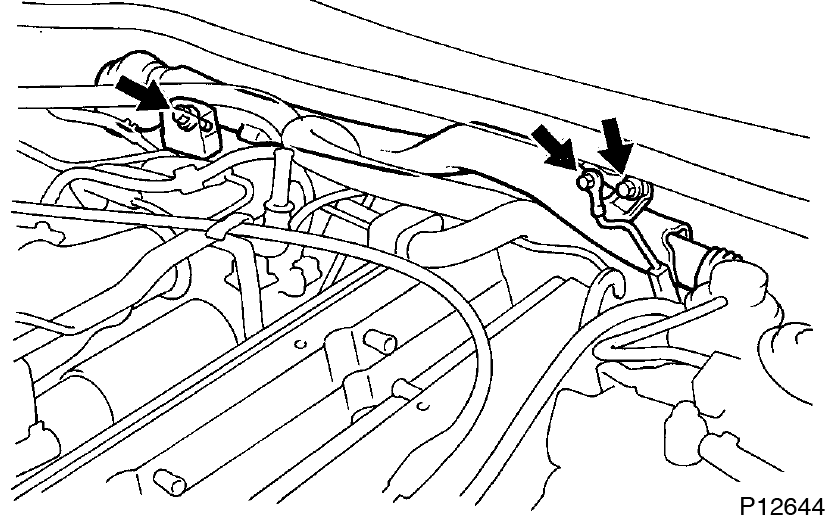
- Remove the bolt, and disconnect the ground strap.
- Remove the 2 bolts, and lift up the engine wire protector.
- Remove IAC valve pipe
- Disconnect the 5 air hoses from the IAC valve pipe.
- Remove the IAC valve pipe from the pipe clamp on the No.1 cylinder head cover.
- Remove No.1 and No.2 cylinder head covers
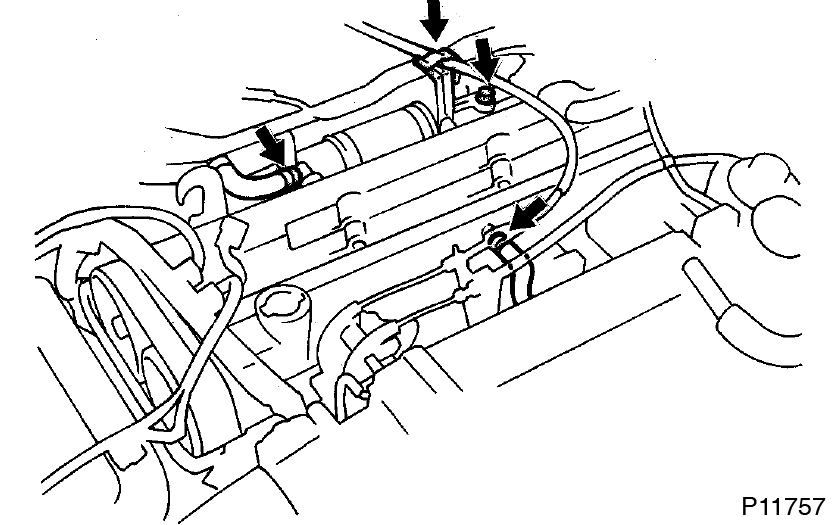
- Disconnect the cruise control actuator cable from the cable bracket.
- Remove the bolt holding the VSV to the turbo outlet duct.
- Disconnect the 2 PCV hoses from the cylinder head covers.
- Remove the 6 bolts, 2 nuts, 8 seal washers, No.1 cylinder head cover and gasket.
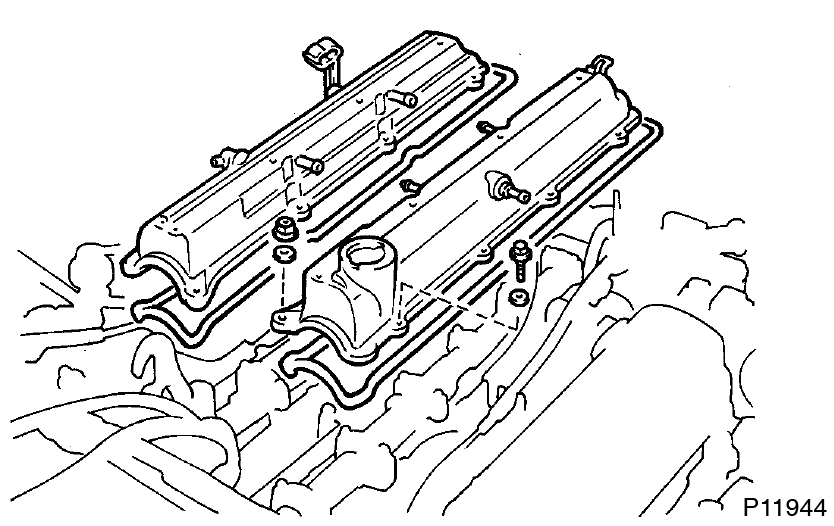
- Remove the 6 bolts, 2 nuts, 8 seal washers, No.2 cylinder head cover and gasket.
- Set No.1 cylinder to TDC/compression
- Turn the crankshaft pulley, and align its groove with timing mark ”O” of the No.1 timing belt cover.
Always turn the crankshaft clockwise.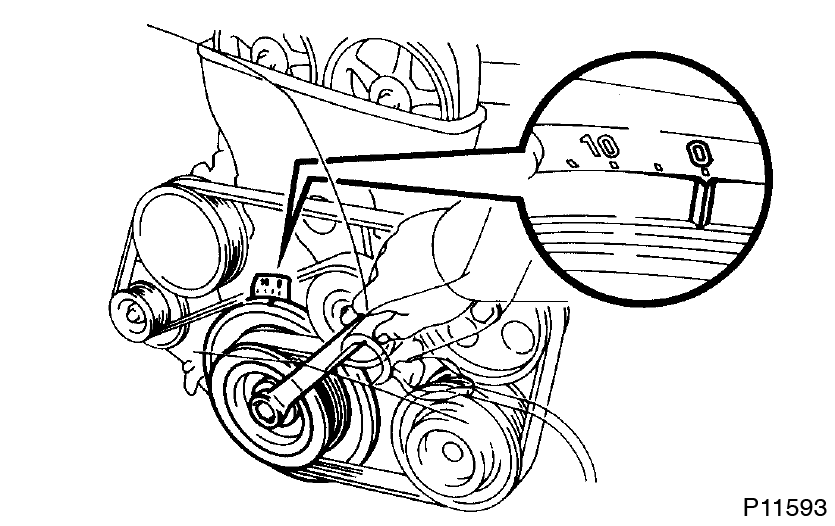
- Check that the timing marks of the camshaft timing pulleys are aligned with the timing marks of the No.4 timing belt cover.
If not, turn the crankshaft 1 revolution (360°).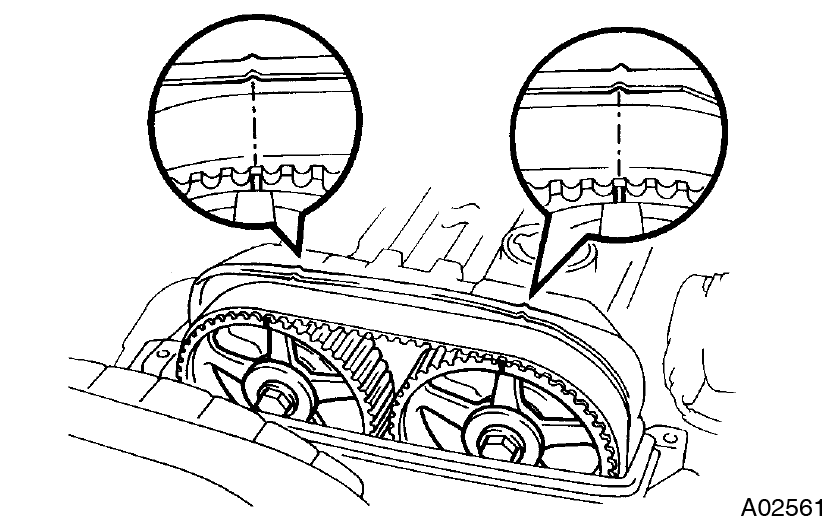
- Turn the crankshaft pulley, and align its groove with timing mark ”O” of the No.1 timing belt cover.
- Inspect valve clearance
- Check only those valves indicated in the illustration.
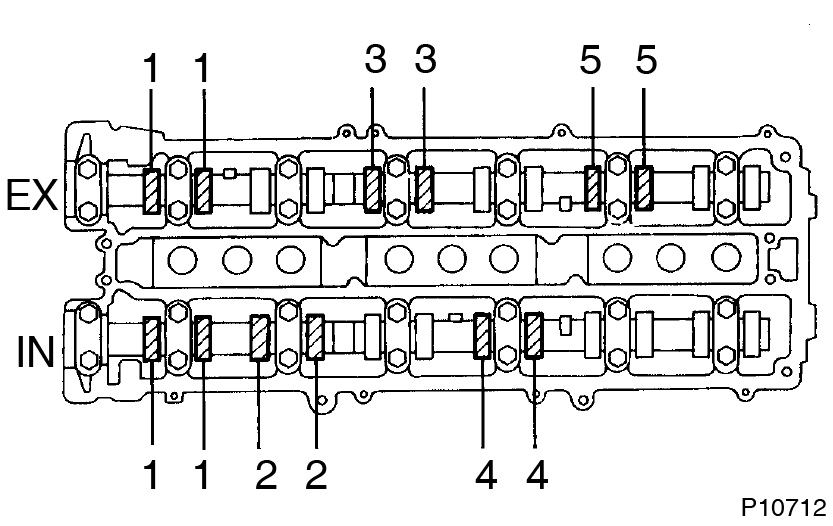
- Using a feeler gauge, measure the clearance between the valve lifter and camshaft.
- Record the valve clearance measurements of those that are out of specification. They will be used later to determine the required replacement adjusting shim.
- Intake 0.15 - 0.25 mm (0.006 - 0.010 in.)
- Exhaust 0.25 - 0.35 mm (0.010 - 0.014 in.)
- Turn the crankshaft pulley 1 revolution (360°), and align the groove with timing mark ”O” of the No.1 timing belt cover.
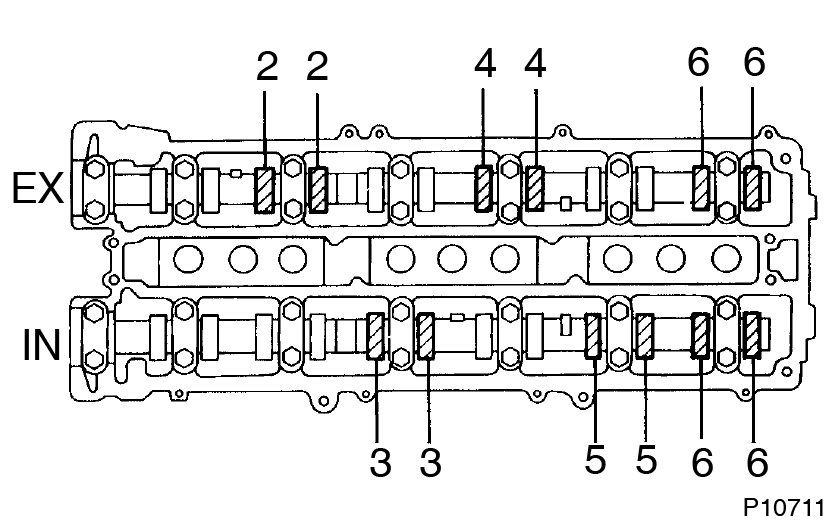
- Check only the valves indicated as shown. Measure the valve clearance. (See procedure in step (a))
- Check only those valves indicated in the illustration.
- Adjust valve clearance
- Remove the adjusting shim.

- Turn the camshaft so that the cam lobe for the valve to be adjusted faces up.
- Turn the valve lifter with a screwdriver so that the notches are perpendicular to the camshaft.
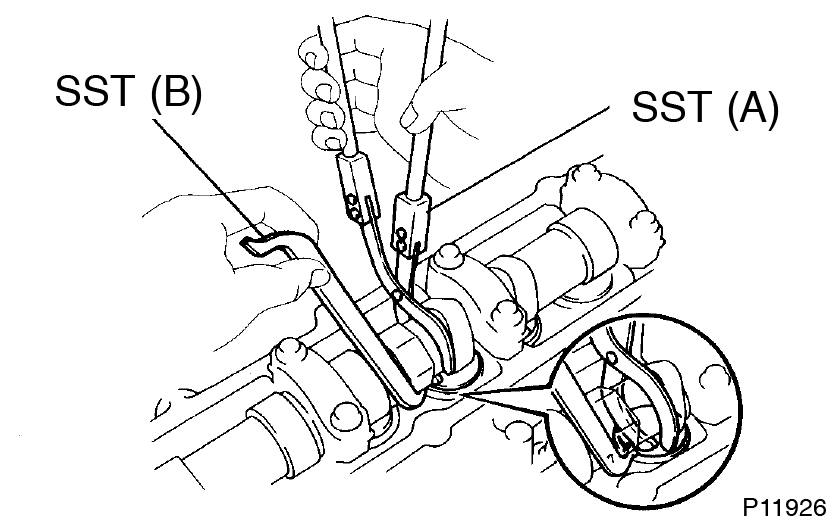
- Using SST (A), hold the camshaft as shown in the illustration.
SST 09248–55040 (09248–05410)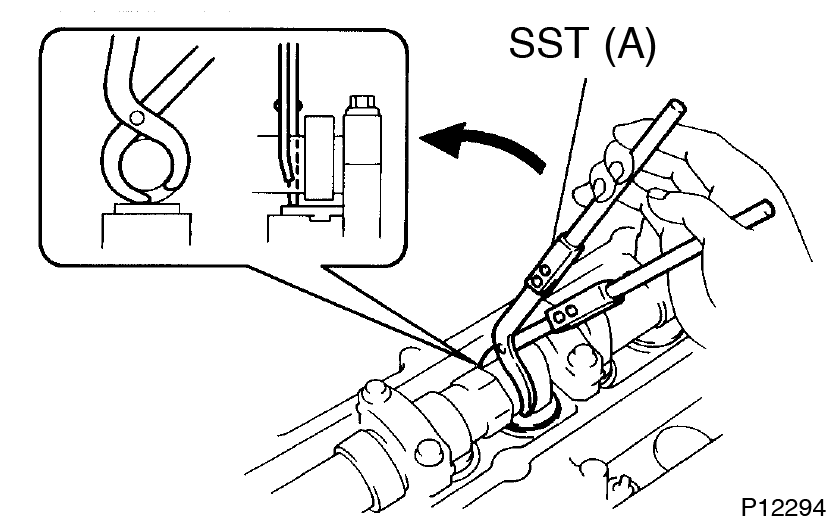
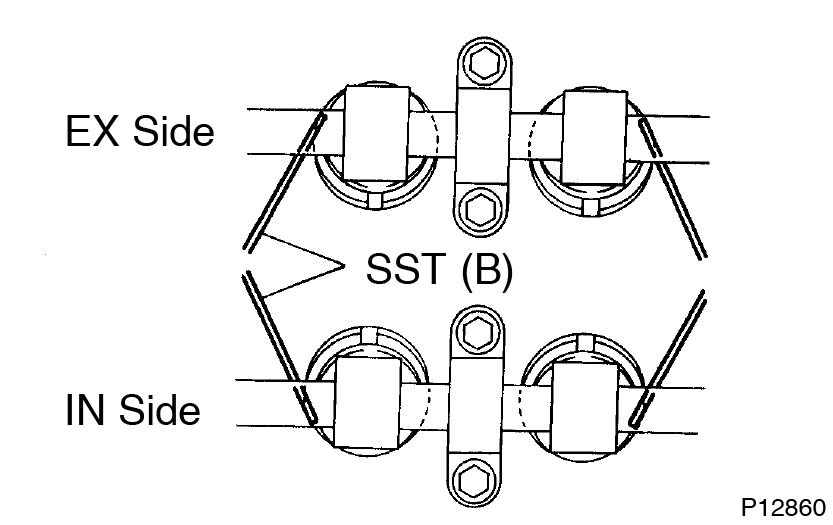
- Using SST (A), press down the valve lifter and place SST (B) between the camshaft and valve lifter. Remove SST (A).
SST 09248–55040 (09248–05410, 09248–05420)
- Apply SST (B) at slight angle on the side marked with ”7”, at the position shown in the illustration.
- Insert SST (B) gently from the inside as shown in the illustration.
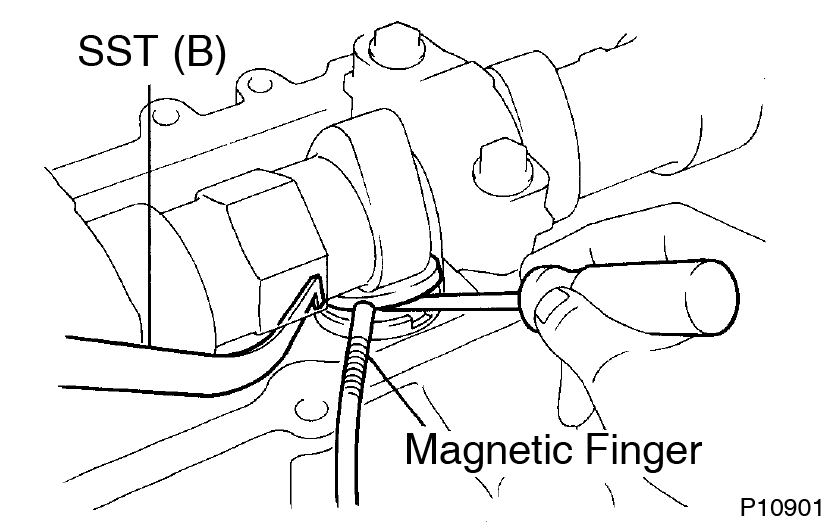
- Using a small screwdriver and a magnetic finger, remove the adjusting shim.
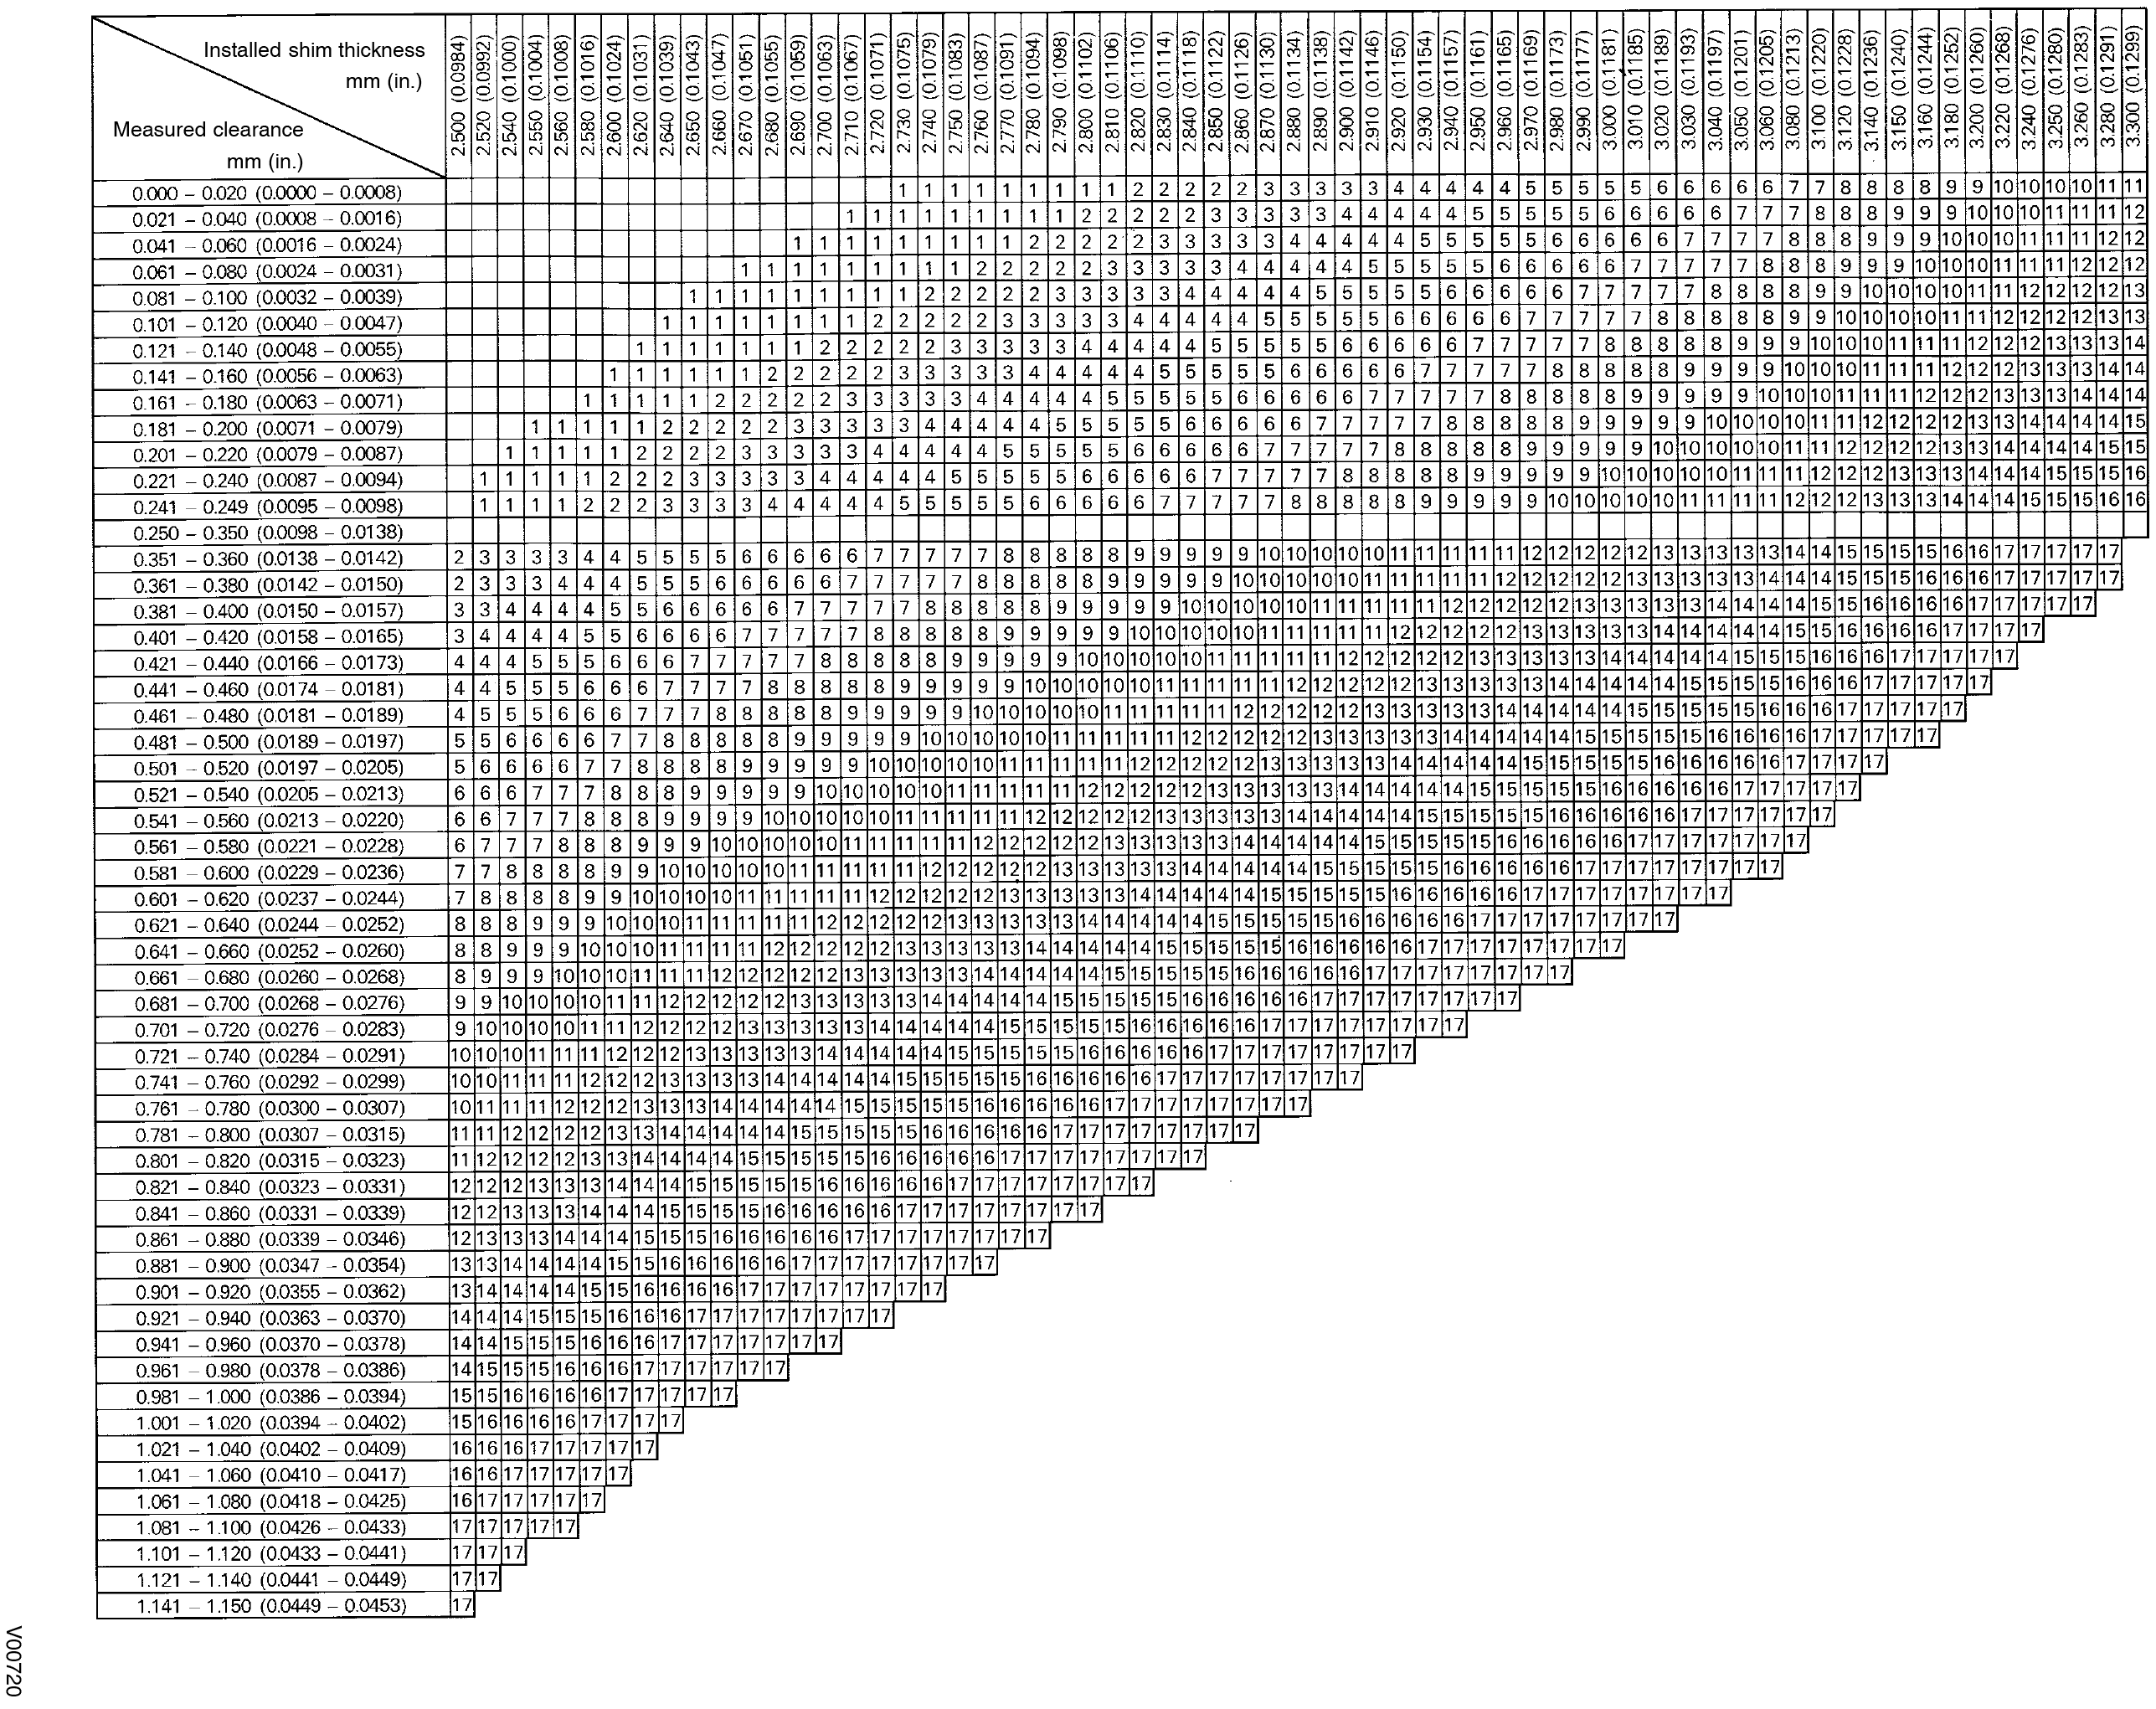
- Determine the replacement adjusting shim size according to the following Formula or Charts:
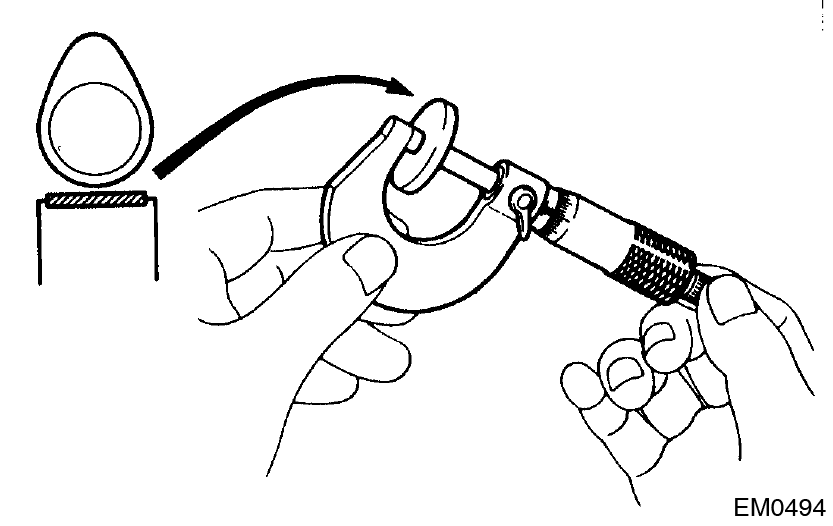
- Using a micrometer, measure the thickness of the removed shim.
- Calculate the thickness of a new shim so the valve clearance comes within specified value.
T ......... Thickness of used shim
A ......... Measured valve clearance
N ......... Thickness of new shim
Intake
N = T + (A - 0.20 mm (0.008 in.))
Exhaust
N = T + (A - 0.30 mm (0.012 in.)) - Select a new shim with a thickness as close as possible to the calculated values.
Shims are available in 17 sizes in increments of 0.050 mm (0.0020 in.), from 2.500 mm (0.0984 in.) to 3.300 mm (0.1299 in.). - Install a new adjusting shim.
- Place a new adjusting shim on the valve lifter, with imprinted numbers facing down.
- Press down the valve lifter with SST (A), and remove SST (B).
SST 09248–55040
- Recheck the valve clearance.
- Remove the adjusting shim.
- Reinstall No.1 and No.2 cylinder head covers
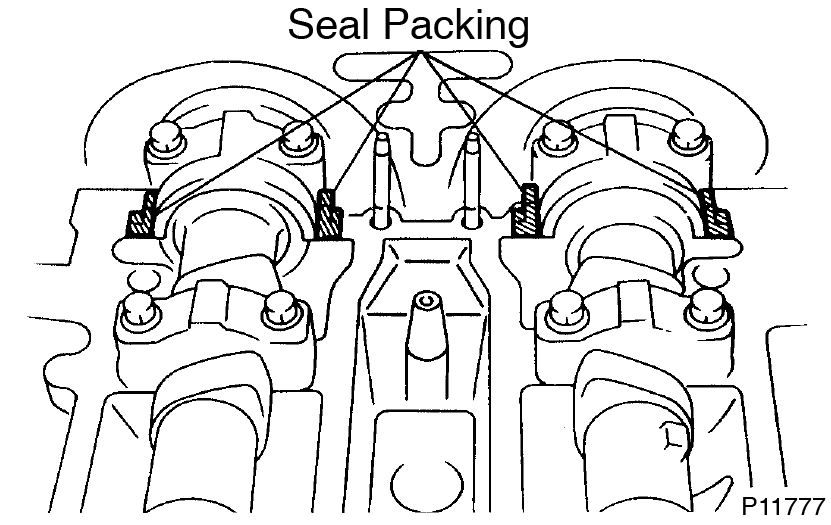
- Remove any old packing (FIPG) material.
- Apply seal packing to the cylinder head as shown in the illustration.
Seal packing:
Part No. 08826-00080 or equivalent - Install the gaskets to the No.1 and No.2 cylinder head covers.
- Install the 12 seal washers to the bolts.
- Install the No.2 cylinder head cover with the 6 bolts, 4 seal washers and 4 nuts..
Torque: 5.4 N·m (55 kgf·cm, 48 in.·lbf) - Install the No.1 cylinder head cover with the 6 bolts, 4 seal washers and 4 nuts..
Torque: 5.4 N·m (55 kgf·cm, 48 in.·lbf) - Connect the 2 PCV hoses to the cylinder head covers.
- Install the bolt holding the VSV to the turbo outlet duct.
- Connect the cruise control actuator cable to the cable bracket.
- Reconnect engine wire protector to No.4 timing belt cover
- Reinstall IAC valve pipe
- Reconnect engine wire protector to cowl top panel
- Reinstall ignition coils assemblies (See page IG-7 )
Adjusting Shim Selection Chart (Intake)
 Intake valve clearance (Cold):
 0.15 - 0.25 mm (0.006 - 0.010 in.)
Replace the 2.800 mm (0.1102 in.) shim with a new No.12 shim.
| New shim thickness | mm (in.) |
| Shim No. | Thickness |
| 1 | 2.500 (0.0984) |
| 2 | 2.550 (0.1004) |
| 3 | 2.600 (0.1024) |
| 4 | 2.650 (0.1043) |
| 5 | 2.700 (0.1063) |
| 6 | 2.750 (0.1083) |
| 7 | 2.800 (0.1102) |
| 8 | 2.850 (0.1122) |
| 9 | 2.900 (0.1142) |
| 10 | 2.950 (0.1161) |
| 11 | 3.000 (0.1181) |
| 12 | 3.050 (0.1201) |
| 13 | 3.100 (0.1220) |
| 14 | 3.150 (0.1240) |
| 15 | 3.200 (0.1260) |
| 16 | 3.250 (0.1280) |
| 17 | 3.300 (0.1299) |
Adjusting Shim Selection Chart (Exhaust)
 Exhaust valve clearance (Cold):
0.25 - 0.35 mm (0.010 - 0.014 in.)
Replace the 2.800 mm (0.1102 in.) shim with a new No.10 shim.
| ||||||||||||||||||||||||||||||||||||||||
RESETING THE ECU:
When keeping the battery disconnected for a while the ECU will have to "relearn" how to run properly.
DTCs and freeze-frame data may also be cleared by removing EFI fuse from fuse block, located in engine compartment. DTCs and freeze-frame data may also be cleared by disconnecting negative battery cable. However, other memory functions (clock, radio, alarm, seats, etc.) will be cancelled and must be reset.
So pull the EFI fuse out and then put it back in just to clear the codes.
Disconnect the battery and reconnect to clear the long term trim tables.
No mention of leaving it any time at all.
As for relearning process of an ECU, they say this:
Automatic Transmission:
*Set parking brake, start engine in "P" or "N" position. Warm-up vehicle to normal operating temperature.
*Allow vehicle to idle for one minute in "N" position. Select "D" and allow engine to idle for one minute.
*Accelerate at normal throttle position (20-50%) until vehicle shifts into top gear.
*Cruise at light to medium throttle.
*Decelerate to a stop, allowing vehicle to downshift, and use brakes normally.
*Process may be repeated as necessary.
Manual Transmission:
*Place transmission in Neutral position.
*Ensure emergency brake has been set and all accessories are turned off.
*Start engine and bring to normal operating temperature.
*Allow vehicle to idle in Neutral for one minute.
*Initial relearn is complete: process will be completed during normal driving.
Personally I just start the car and go for a little drive. =)
Toyota 2JZ-GE vs 2JZ-GTE Engine Guide
There is nothing left unsaid about Toyota’s 2JZ engine. Over the past 30 years, it has become one of the most famous engines in existence. Enthusiasts can’t get enough of Toyota’s flagship inline-6 powerhouse for good reason.
Replacing the 1JZ, known for its high power potential and smooth power delivery, the 2JZ is nearly identical in construction. However, the 2JZ is even more desirable due to its 3-liter displacement. With the introduction of the 2JZ platform came multiple variants for use in different cars.
Toyota developed three 2JZ variants beginning in 1991. These variants included the 2JZ-GE, 2JZ-GTE, and 2JZ-FSE. While the 2JZ-FSE has some interesting attributes worthy of discussion, we’ll only be comparing the 2JZ-GE and 2JZ-GTE variants.
2JZ-GE vs 2JZ-GTE Engine Fundamentals
Before we cover the differences between 2JZ variants, we’ll discuss their similarities first. Both variants share very similar design philosophies, proving that they truly are blood relatives.
Both the 2JZ-GE and 2JZ-GTE are based fundamentally on the Toyota inline-6s that preceded them. Toyota learned from the 7M-GTE and 1JZ and refined their inline-6 formula through trial and error. Through the success of the 1JZ engine, which was praised in virtually every aspect, Toyota learned that overengineering and solid build construction was important for reliability and customer satisfaction. Toyota carried that thought process into the development of the 2JZ platform.
Both the 2JZ-GE and 2JZ-GTE feature a cast-iron block and aluminum cylinder head, ensuring maximum strength. These are the same materials that were used to construct the 1JZ, cementing it as one of the strongest engines ever built. The 2JZ is also incredibly strong.
Both 2JZ-GE and 2JZ-GTE variants also
share the same stroke and bore and, as a result, displacement. The
overall displacement of all 2JZ engines is 3.0 Liters (2,997cc), with a
stroke and bore of 86 mm × 86 mm (3.39 in × 3.39 in).
As the stroke and bore are the same lengths, all 2JZ engines are
over-square engines. While similar to the 1JZ, the 2JZ has a taller
block deck and longer connecting rods.
Toyota’s use of an over-square design for the 2JZ is beneficial for a few reasons. Primarily, over-square engines tend to have lower peak piston acceleration speeds, which puts less strain on the crank. Combined with the relatively low compression of the 2JZ engine, less extreme forces on internal components lead to a more reliable engine. The over-square design also helps with engine balance, with internal rotational forces canceling each other out.
2JZ-GE vs 2JZ-GTE Engine Differences


2JZ-GE vs 2JZ-GTE Forced Induction
The 2JZ-GTE features forced induction while the 2JZ-GE does not. This is perhaps the most notable, and performance-changing, difference between the 2JZ-GE and 2JZ-GTE. The 2JZ-GTE features a pair of Hitachi sequential twin-turbochargers, which was uncommon in the early 90s. As one of the first engines equipped with sequential twin-turbos, the 2JZ-GTE was ahead of its time.
2JZ-GTEs built for Japan featured a different turbo construction than those made for the rest of the world. Japanese models have CT20 ceramic turbos, while export spec 2JZ-GTEs feature stainless steel CT12B turbos. The addition of turbos on the 2JZ-GTE raised horsepower.
As discussed earlier, the 2JZ-GTE features a few key design choices that make it ripe for forced induction. The over-square, long-stroke design of the 2JZ makes high-RPM power delivery a priority. This setup is ideal for high boost loads. The low compression ratio, which we’ll discuss in greater depth, also makes high-boost less strenuous on internal parts.
As the 2JZ-GTE was designed with motorsport applications in mind, it was only used in Toyota’s performance-oriented lineup. At the time, that meant that 2JZ-GTEs were only used in a few of Toyota’s production cars. The only vehicles to receive the sequentially twin-turbocharged 2JZ-GTE are as follows:
- Toyota Aristo 3.0V JZS147 (Japan-only)
- Aristo V300 JZS161 (Japan-only)
- Toyota Supra RZ/Turbo JZA80
The inclusion of turbochargers made the 2JZ-GTE the most in-demand engine in Toyota’s catalog among enthusiasts, as it remains today. The 2JZ-GTE also features some additional upgrades over the 2JZ-GE that make it more desirable.
Different Cylinder Head Designs
A key difference between the 2JZ-GE and 2JZ-GTE is their cylinder head designs. As the 2JZ-GTE was designed with forced induction in mind, some key changes were made to the cylinder head to be more supportive of boost.
As mentioned above, both variants of the 2JZ have an aluminum head that both feature electronic fuel injection. However, each head is designed with a different purpose in mind as far as flow is concerned.
The general consensus in the 2JZ community is that the 2JZ-GTE head has better flow on the intake side, while the 2JZ-GE has better exhaust flow. Increased intake flow in the 2JZ-GTE is due to the larger intake ports which allow higher flow at higher RPMs. This helps support high-RPM turbo performance. While the 2JZ-GTE has larger intake ports than the GE, it has smaller exhaust ports.
In comparison, the 2JZ-GE features smaller intake ports designed to increase velocity into the cylinder at lower RPMs. The smaller ports are also placed higher up on the head to align for a more direct shot into the cylinder. This allows atmospheric pressure to work better.
The exhaust ports on both engines are
arranged differently on the exhaust side of the head. Where all six of
the 2JZ-GE exhaust ports are arranged directly in sequence, the 2JZ-GTE
features a different design. The 2JZ-GTE’s exhaust ports are arranged in
banks of three, with a gap between the first and last three.
Overall, it is a contentious debate about which head flows better, as each serves its purpose for the engine it was designed for. However, it must be said that the 2JZ-GTE has much more aftermarket support when it comes to intake and exhaust manifolds.
Differences in Piston Tops
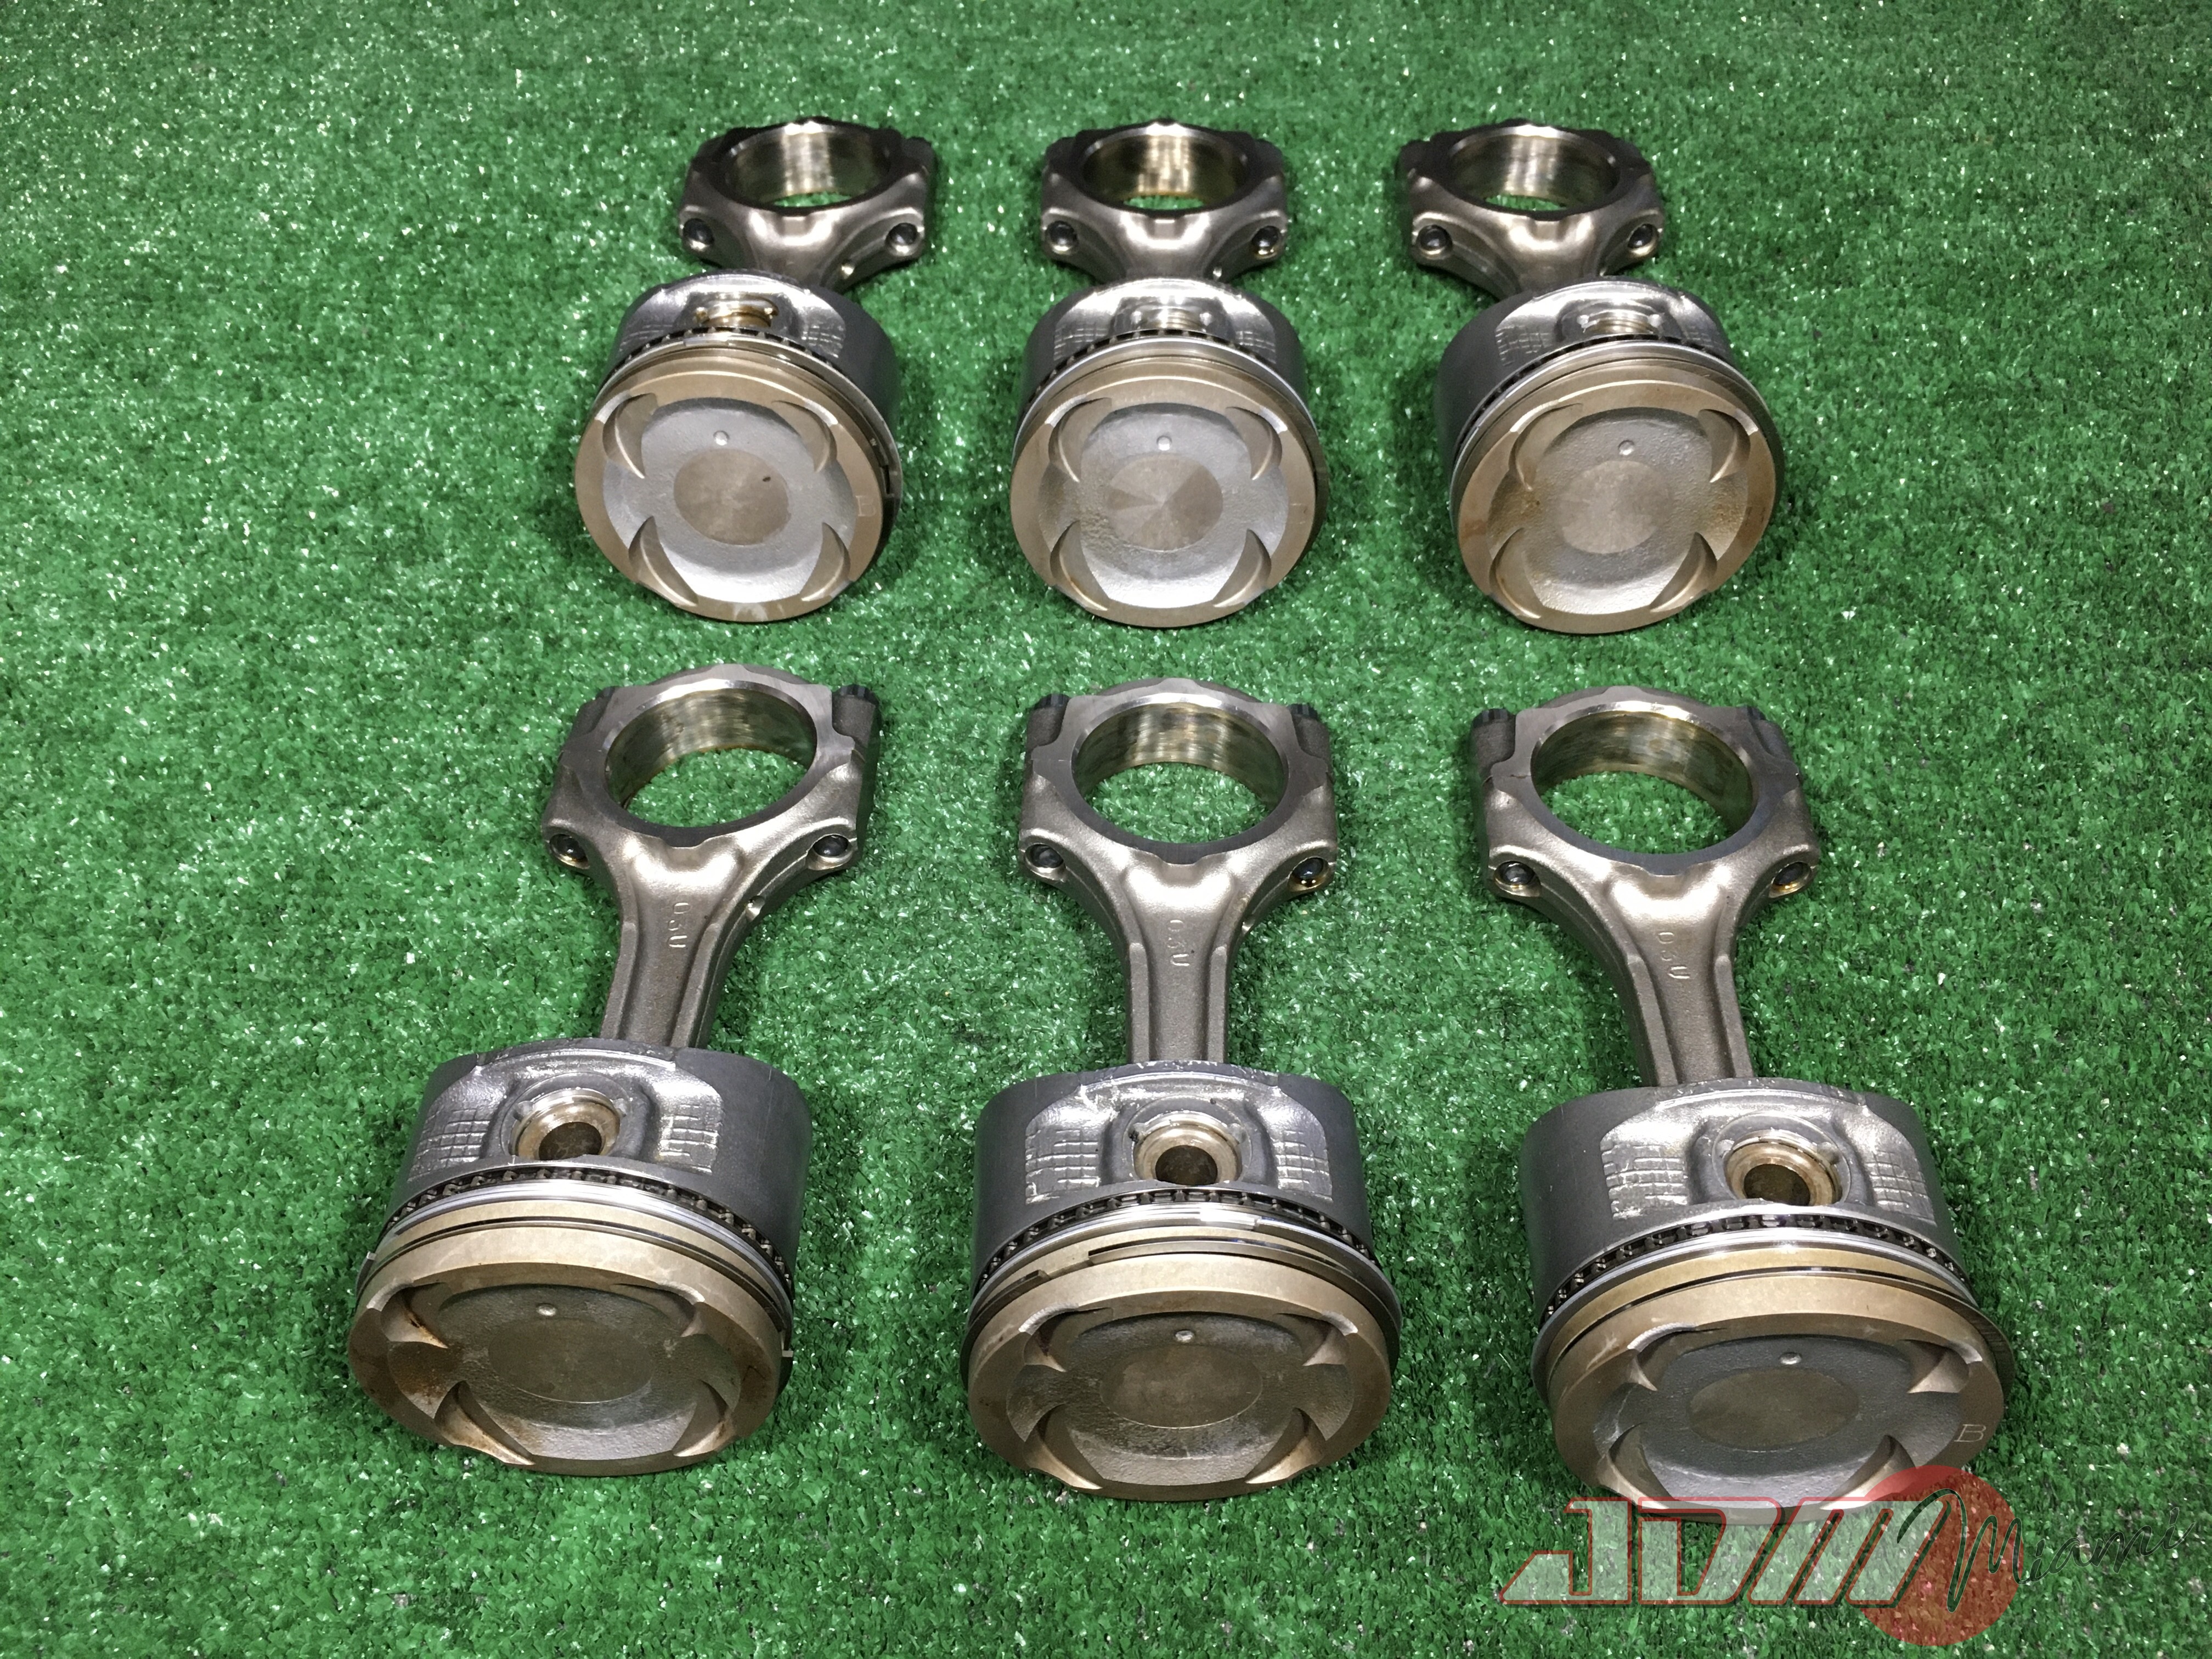
Moving on to pistons. In totality, Toyota 2JZ-GE and 2JZ-GTE pistons are extremely similar in terms of build quality and construction. Both feature hypereutectic cast pistons that feature identical rod construction and build.
A subtle, yet important difference to mention is that the piston rings on the 2JZ-GE are much thinner when compared to the GTE. The difference in piston ring thickness boils down to the additional stress added by forced induction on the 2JZ-GTE.
While the general construction of the pistons on both 2JZ variants is the same, the 2JZ-GTE features recessed piston tops. The purpose of this difference in design is to decrease overall compression in the 2JZ-GTE engine. Lower compression is ideal for turbocharged engines as forced induction creates an excess amount of pressure within an engine. Decreasing compression lowers overall internal pressure, which puts less strain on internal components. This compensates for the increased strain caused by forced induction.
2JZ-GTE Oil-Cooled Pistons
Rounding out the primary differences between the 2JZ-GE and 2JZ-GTE is the presence of cooling oil squirters on the 2JZ-GTE. The primary purpose of block-mounted oil coolers is to cool piston temperatures at high RPMs. As nearly 80 percent of excess heat created by an engine is transferred to the pistons, it is important that their heat is managed. Toyota approached this issue by using oil squirters; technology typically reserved for motorsport applications.
The 2JZ-GTE block has an incorporated port near each cylinder, angled towards the underside of the pistons. The squirter nozzles spray the underside of each piston, opposite the combustion-facing piston head. Stock 2JZ-GTE pistons feature internal channels that allow oil to flow through them. While this process doesn’t increase the strength of the pistons, it does increase reliability.
The reason that Toyota chose to include oil squirters on the 2JZ-GTE and not the 2JZ-GE is due to the excess heat created by forced induction. While a 2JZ-GTE running stock boost would likely be fine without squirters, reliability was a primary focus for Toyota.
While oil squirters are unquestionably beneficial for a stock 2JZ-GTE, their effectiveness on a heavily modified engine is contested. Even though the likes of Formula 1 and NASCAR employ oil squirters on their high-performance engines, construction of those engines is vastly different than that of a 2JZ-GTE. Some argue that the dramatic temperature changes caused by oil squirters can damage the cast-iron block at high boost levels.
2JZ-GE vs 2JZ-GTE Engine Summary
In the vast world of 2JZ engine discussions, it is generally concluded that all 2JZ variants are legendary. As the 2JZ-GE and 2JZ-GTE share almost identical DNA, their similarities are more numerous than their differences. With that being said, the 2JZ-GE vs 2JZ-GTE debate continues to this day. At the end of the day, neither variant is likely to let you down.
There are some key differences between the 2JZ-GE and 2JZ-GTE, despite their sibling relationship. Most notably, the sequential twin-turbos on the GTE significantly increase horsepower and torque.
Almost all of the other differences between the two 2JZ variants stem from the presence of forced induction on the GTE. Toyota designed the GTE’s cylinder head for increased intake flow. Recessed piston tops used in the 2JZ-GTE lower compression, making boost safer for internal components. The same ideology is at play when it comes to the GTE’s inclusion of piston oil squirters.
Either way, both the 2JZ-GE and 2JZ-GTE are some of the strongest production engines to date. As a result, there is plenty of aftermarket potential for both, and truckloads of information about each. The 2JZ family is truly Toyota’s inline-6 swan song. Many argue that there will never be anything better.
If you found this article about the Toyota 2JZ-GE vs 2JZ-GTE engines helpful, check out our other Toyota engine articles. You might find our article on the topic of Toyota 1JZ vs 2JZ engines interesting. Otherwise, we have a handy 2JZ-GTE turbo upgrade guide as well. As always, safe driving!
No comments:
Post a Comment